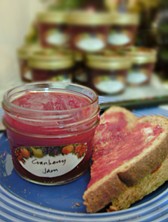
Cranberry Jam

Homemade jam is delicious & unbelievably easy. This is preserved jam, so you don’t need to refrigerate it until it’s opened, making it the ideal food gift to send to out-of-town friends, or to have on hand for last-minute giving. The whole process takes only about an hour, start to finish.
You can find jelly jars in the pickle section of most grocery stores. Look for jelly jars (also called “quilted jelly jars”), which are smaller than regular mason jars and usually include decorated labels. If you buy a case, they’ll come with the lids and rings. If you’re using old jars, be sure to buy new lids so that you’ll get a proper seal–used lids won’t seal properly and will cause spoilage.
2 – 12 ounce bags of fresh or unthawed frozen cranberries, rinsed and picked over
3 cups sugar
1 cup fresh orange juice
1 cup water
1 case (12) of 4 ounce jelly jars (available in grocery stores–look in the pickle section), 6 8 ounce jelly jars, or 3 12 ounce jars
In a pot large enough to hold a rack and jelly jars covered with an inch of water, boil the jars, the lids, and the rings to sterilize. Boil for about 5 minutes and leave in hot water until you’re ready to fill them. If the pot can only hold a few jars, no problem; just sterilize and process the jars in batches.
Combine ingredients in a large, heavy saucepan. Bring to a boil, stirring occasionally. Reduce heat and simmer, stirring occasionally, until thick, about 20 minutes (jam will continue to thicken as it cools).
Pulse jam in food processor or blender. Jam should be pureed, but still a bit rough.
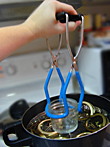
Remove a jar from the hot water with tongs. Fill with jam, wipe the edge if you’ve dribbled any, place the lid on top, and hand-tighten the ring. Just tighten it until snug–it doesn’t need to be closed with the death grip. As you fill and close each jar, place it back in the pot of water. (see NOTES, below)
When you’ve replaced all the jars, bring the water to a boil again (replacing evaporated water if necessary to cover jars with 1 inch of water. Boil rapidly for 5 minutes. Remove processed jars to a rack and cool 12- 24 hours. As jars cool, they’ll create a vacuum (you’ll notice the lids sucking down onto the jars as they cool). If the lids still pop when you press on them after 24 hours, they haven’t sealed properly. The jam is still fine to eat, but you’ll need to refrigerate it. Sealed jam can be kept on the shelf until opened. Refrigerate after opening.
NOTES:

Replace jars in pot as you fill them. Add water if necessary to cover jars by one inch. I didn’t have a rack for this particular pot, so I just used a vegetable steamer.

Although not absolutely essential, a jar lifter is a handy way to safely get the hot jars out of the pot. If you’re careful, you can also use regular tongs, or you could drain the pot somewhat first and remove hot jars with potholders.
Leave a Comment
You must be logged in to post a comment.
